Creating Something from Nothing - An Ongoing Project
- Kohen Wolski

- May 5, 2019
- 7 min read
Updated: May 8, 2019
I like a challenge and I like to problem solve. So what better challenge then to make a game using only free to download assets? I laid some ground rules and conditions for myself:
Cannot purchase assets
Assets should be licenced to use either royalty free or non-commercial personal use
Must be a complete level
Multiple enemy types
Basic puzzle
Final boss
I can create basic assets if I wish (anything that could be modelled, unwrapped and textured in less than an hour)
Initial Plan and Ideas
Thinking about types of games that I feel most confident in my ability to create and the likelihood of asset availability to suit those games, I felt a First Person Shooter (FPS) would work well. Some of the key elements as to why this was a good idea include:
No need for a player model
There are a lot of opportunities for mechanics
The pace and tone of an FPS can be easily altered with only a few variable changes
I have played a lot of FPS games in my life since the 90’s, both good and bad, but some that I looked at the most in my early studies of game development included the likes of Serious Sam, Doom and Painkiller. I elected to begin development of a Painkiller influenced shooter but kept my scope open to make allowances for the assets I may find. (If you have not played the first Painkiller, developed by People Can Fly, I heavily suggest you do so!)

The next big step was to begin looking for assets to work with; based on the “ground rules” I had set myself. I completed several asset passes, prioritising the search for big ticket asset items first (seeing what was available on the free market), coming back at latter stages of the game’s development for less significant items.
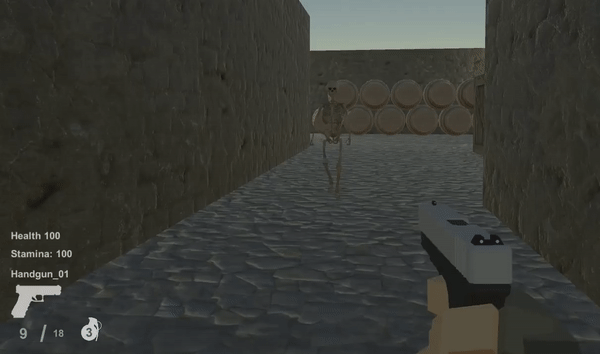
First pass - I need guns for the player to use, an enemy that needs killing and textures to make the grey boxes a little less dull. Admittedly, the last one was not a big ticket item - I just hate staring at grey walls and floors for too long!
I found this Skeleton (https://www.cgtrader.com/free-3d-models/character/anatomy/skeleton-e7f32f47-1381-4c18-b3eb-b4f201591ea2) on cgtrader that contained a bunch of animations to work with. Then I found this free FPS gun pack on the Asset Store (https://assetstore.unity.com/packages/3d/props/weapons/low-poly-fps-pack-free-sample-144839) which gave me plenty of animations and a few models to work with.
Having a Skeleton as my primary enemy suggested having a dungeon or cave as my game location. A quick Google search for rock/paver textures returned some good tileable assets to use on the floors and walls. The textures by themselves were a little boring, so I quickly ran them through a program called MindTex 2, which allowed me to generate some extra texture maps, but most importantly - the normal maps.

Going into Unity, the FPS pack imported well and worked straight off the bat – however, it was evident that it had many existing flaws and issues. Much of the logic is attached to the playing animation and with simple manipulation I could: instantly reload by doing a quick attack right after hitting the reload key then firing; interrupt knife attacks easily with other animations; and constantly reload even when the gun was fully loaded. These issues would require attention later on in the game’s development.

The Skeleton did not import so easily. Animations were not clipped, leaving me to decipher where the animation’s start and end frames were throughout the one long animation file that was provided. That’s ok – after all this was supposed to be a challenge.

The next step involved setting up the Enemy Animator and coding behaviour logic alongside it. A final goal for my enemy was to have them using a path-finding AI – however, initially I just wanted to have them moving simply so I could determine what they looked like in-game as a combatable enemy. I created a script that made them move towards a target – in this case the player’s world position. However, I did not want enemies travelling from the entire map to reach the player, so I added a condition that the player has to be within a certain distance to aggro the enemy. Once the enemy could reach a target, I then began developing the combat logic (i.e. stop moving and start attacking). The Skeletons have three attacks to choose from, which (for the moment) they randomly execute. Once I had defined a game loop, I would then take another look at their combat decision-making and refine it further – possibly limiting certain attacks to specific enemy types.

Damage and health was on the agenda next. The bullet prefab already contained collision detection, so I expanded on that by adding an “Enemy” tag, allowing the bullet to execute a public damage function on the Enemy’s behaviour script. I set the Skeleton’s health at 100 and set the damage received from each bullet to a range between 10 and 30. The Skeleton came with a stumble back animation and a light hit animation. I made use of this by setting a critical damage variable, where in the event the Skeleton receives damage 25 or over, it will stumble back, and every other hit below 25 plays a light hit animation. In previous experience, the inclusion of ragdoll physics-based models for enemy death events can be fun and add a visual and interactive edge to a game. With that idea in mind, I created a new prefab with the Skeleton mesh and made a ragdoll that spawns when a Skeleton dies, disappearing after a short time. The initial ragdoll model had an issue with the lower spine glitching – which, with a second attempt at creating the ragdoll, fixed the issue.
From here I equipped the Skeletons with weapons – invisible ones in the form of a collision volume attached to their hand, on the condition that it is only active during the Skeleton’s attack animations. In the same way the bullet notifies the other collider upon impact, the enemy attacks do the same in notifying the player. After some testing, the correct volume size was determined to fit the average attack distance and animation paths.

Learning from a post-mortem of a project I previously worked on, and having a short programme in which I needed to complete this game, I determined I could do more with less by implementing some simple “smoke and mirrors” elements. I did not necessarily need multiple enemy models to make several types of enemies – I can easily duplicate, re-scale and re-texture my existing ones. The first alternate enemy is a slightly larger Skeleton that is red. But to make a true alternate enemy they need more than just a visual update. For this second enemy I enabled the ability to run and adjusted the movement variable to fit accordingly with the animation. Utilising the same trick, I re-scaled and re-textured the default Skeleton to a significantly smaller and bluish-green colour, with the design principle and intention that this will be a “swarm enemy” that congregates in large groups. After some simple adjustments to the base model, I now had three enemies to spread around the map – plenty for a first level. Balancing their health, damage and speed happens at a later stage in development.

While I am in the zone of making enemies, I prepared the Boss prefab. Again I re-textured and re-scaled the base model to be significantly larger. The boss fight needed to be unique – so instead of it using attack animations, I implemented a large explosion attack that the boss charges up in the event the player gets too close. The trap is that the room is not big enough to get very far away and the Boss is always walking towards the player, resulting in the player only having short rests.

Up until this point in the game development, the player has had infinite ammo, which was easily adjusted in the code by setting up a reserve ammo variable and implementing straight-forward logic. Now, with limited ammo available, I needed to provide ammo pickups. This was an easy prefab setup with some bullet models, particles, light and a trigger.
Ammo Pickup, unloaded gun inspection & reload
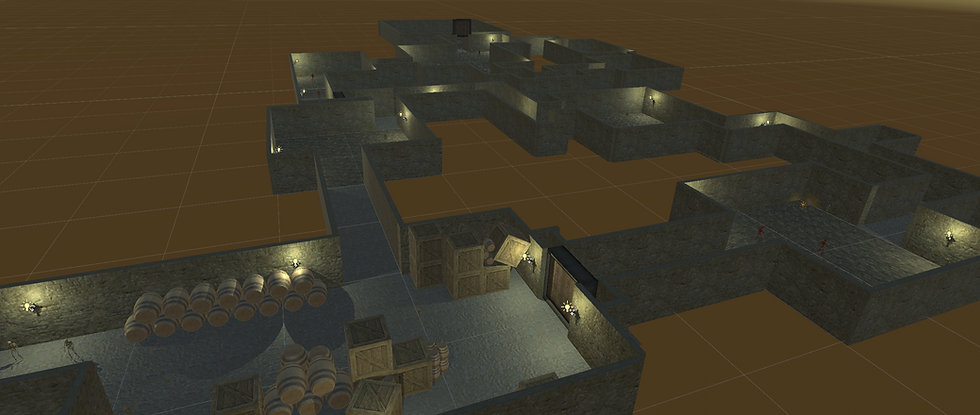
Now that I had a few working elements to play with, I was able to structure a basic level using cubes with the textures I had prepared previously. After laying out a level I was happy to start with, I began to populate the level with my enemy prefabs and ammo pickups.
The game in this state was far too easy, as the player could sprint around enemies indefinitely. I decided to then implement a stamina mechanic that would regenerate much slower than it depleted. The result of this meant that players could not easily run out of enemy aggro range and had to fight more often.
Now that players were not able to run away from each encounter, I discovered that it was too easy to spam the knife attack and quickly defeat enemies. My answer to this problem involved tying the knife attack abilities to the stamina mechanic and the sprint, essentially restricting how many attacks could be done before stamina was drained. This put the stamina mechanic in a position where the player would have to balance their usage depending on the fight-or-flight situation.
Stamina depletion demonstration - Knife Attacks & Sprinting
My approach to setting up the map meant that it was easy for players to miss significant portions of the map if they took a wrong turn. To fix this I used a simple door and key mechanism by introducing a large door model into the map to prevent progression too quickly. As the general feel of the level is dark due to low lighting and dark texturing, I felt it was necessary to make the key stand out to give it significance and prevent player confusion. I swiftly modelled and textured the key myself, making it gold and giving it some subtle particle effects and lighting. Initially I planned to place it within easy view at the centre of a room, but then thought that I could do something more interesting (with little effort). In the end, I chose to place it on an enemy that could drop it in the event of their death and as a result, the key holding Skeleton stands out from its compatriots.

Now that the level progression had a basic structure to it, I felt the ending battle could be further refined by giving the Boss a dramatic entry sequence. For further effect, I covered the Boss in a flame emitter to make it stand out further. As the main Boss charge attack had no visual warning, I searched online for a sound that could represent the charging period of the attack. Using a two second charge sound, I mirrored the wavelength to give it an interesting sound progression that was closer to the length I required of four seconds. The Boss death was also dramatized by having them explode at the end, giving the Boss encounter a complete loop.

In its current state, the game consists of a standard level progression, lock and key puzzle, multiple enemy types and a final boss encounter – plenty of elements that can be further refined into a more challenging experience (on another weekend). The next steps for development will entail: adjusting enemy location, health, damage and speed stats for better balance; optimizing enemy logic; and populating the world with props.
TO BE CONTINUED…
Comments